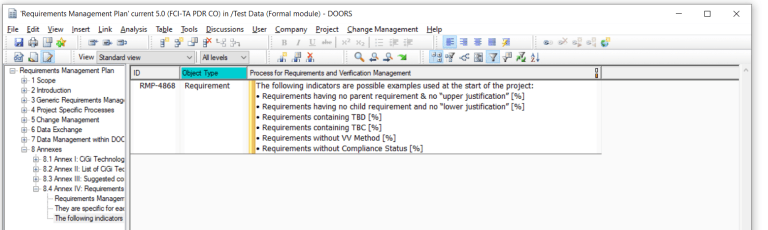
Often at the start of a project some of the design criteria, limits or ranges are not known and “To Be Defined” (TBD) or “To Be Checked”/”To Be Completed” (TBC) are used in place of, or together with, the proposed values. For example, the value maybe defined but followed by (TBC).
As the project progresses, then more detail will be
designed, and the requirements can be completed without these limitations.
What would be very useful is a DXL script to identify these
requirements which have been annotated in this way.
DXL script to apply a filter for TBD/TBC
This DXL script simply applies a filter for TBD or TBC for
all requirements (as defined by the Object Type).
Once again, we come up against a failing of DOORS Classic. How do you manage links?
As an example, the database administrator decides at the start of the project to have a single link set for all ‘satisfies’ links. Later the decision is made to have separate link modules for each sub project. The original ‘satisfies’ module has to be split into multiple link modules and the links from each requirement placed into one of the new link modules. To do this using classic DOORS is very labour intensive (and error prone).
This utility does this splitting for you. It is very simple.
It copies or moves the links from any module pair to another other set of
modules though any link module. In the above use case, the administrator will
need to open up each module in turn and move the links into the correct link
module.
Link Manager utility
It is run from within the source module and has 2 mutually
exclusive options:
Move
the links OR
Copy
the links
It also has 2 toggle modes:
The ‘Dry Run’ mode (default) where it analyses the links and displays a list of proposed changes. This enables a review to be made before the links are actually made. If this mode is switched off, then the links are created.
The log results mode that displays the results in the DOORS interaction window.
Rather than browsing
every time, each link, source or target module cut and paste directly
into the relevant box.
Note that it assumes that the link set pairings have already
been created for the new links although future enhancements of the tool could
build these automatically.
It could also be
adapted to be run from the main DOORS window and perhaps select groups of modules
for the same action.
In almost every project I have worked on there is a need to
export the requirement set into Word as a requirement specification and get it reviewed,
approved and distributed. And in a lot of cases that is how the requirements
arrive; as a requirement specification that has to be imported into DOORS.
When importing or exporting then the front pages of the Word
document are not part of the requirements – or at least they should not be. The
requirements module should only contain the requirements and not the front matter.
Where does all that information go? You also need to correlate the document
versions with the module/project baselines. So how is this done?
The contents/index can be easily generated in Word but maintaining
the version history, the reviewer and the distribution data is not so easy. Yes,
you could put this in as ‘Information’ in embedded tables at the front of the
requirements, but this is messy to edit. You could even have a separate module
for the data and link it in on the build. But this makes life more complicated.
By far the simplest way is to store this information as module attributes. Clearly a DXL utility to extract, display and edit these module attributes is going to be extremely useful.
Document Manager DXL utility
This DXL Utility is extremely comprehensive and has been
designed to manage all aspects of document management from within DOORS ranging
from document issue, performing baselines and export to PDF.
Firstly, you select the document number- as this tool allows
different documents to be exported from the same requirement module – so you
could export a requirement specification, a VVRM matrix ( pulling in linked
data from the test cases and even test results) and an interface specification (
filtered on interface requirements). Then select the version or issue of the
document (as matched with the module baselines). What is then displayed is the document
title, additional document information (which can be tailored for your
company), the names of the document signatories and the document distribution
record. Often this information is the same for each document and version, but
it can be modified for any combination.
Depending on the user group access then these fields can be either
read only or editable (in the former case the Edit button is disabled). They
can also be locked down if a document is published.
What is also displayed in the lower part of the screen is
the document change history and a series of buttons.
The buttons allow the creation of a new document (which is
how the module can used for multiple documents as described above), creation of
a new issue by execution of a new baseline (major or minor), or the generation
of a pdf. This latter operation is an export using LaTex functionality and it
will use all of the information above, plus a predefined company/document
template containing the company headers and footers to build the complete
document. As an alternative this could be linked to Rational Publishing Engine.
Before the document is produced the user can also enter the pdf
file name and location and whether change bars are required.
The Working Copy entry is for when a document is needed to
be exported for review but not as a formal issue. In which case the document is
water marked as Draft or For Information Only.
Spell checking is always an issue in requirements. It is
important that all spelling mistakes are removed before a requirement is sent for
review so that the reviewers do not spend time correcting typos and forget the
technical stuff.
Layout DXL script to identify spelling mistakes
This script uses the spelling functions of DXL and will identify any misspelt words in a layout DXL column.
It does not prevent mistakes as you type like Word but if
combined with a view to filter on ‘not equal to “OK”’ then it is a simple task
to quickly spell check and correct. The current implementation is for English (UK)
as this is the most common language for requirements but the DXL script could
be adapted for other languages.
Perhaps one of the most important quality attributes necessary for a requirement is to be able to verify the requirement. Some of the phrases and words that we use in every-day language, because they are ambiguous or cannot be verified, should never be used in requirements; some should only be used in exceptional and justified cases. There are also non-specific phrases, pronouns, indefinite pronouns, unmeasured quantifications, indefinite temporal keywords and other grammatical constructs that also should never be used in a requirement.
Layout DXL script to identify banned words
This DXL script will identify any banned words (or rather terms that should be avoided) in a layout DXL column.
It does not prevent mistakes as you type but if combined with a view to filter on requirements and ‘not equal to “OK”’ (which is the default) then it is a simple task to quickly identify areas of concern and correct. The banned word list is currently hardcoded into the DXL script but it could be enhanced to read the list from a specialist module to provide more visibility and ease the maintenance task. The list could be tailored for individual companies.
It is interesting to note that IBM have recently launched
their own Requirements Quality Assistant for DOORS Next.
“Using Watson Natural Language Service and pre-trained AI, the Requirements Quality Assistant has 10 built in quality indicators designed to be consistent with guidelines from the International Council on Systems Engineering (INCOSE) and NASA for writing complete, clear and testable requirements to accelerate your review process, increase requirement quality and reduce training for junior requirements engineers.”
Although this DXL script is not as sophisticated as IBM’s, it nevertheless will highlight words that should be avoided – and at over 150 terms, our list is longer than in the INCOSE guide!
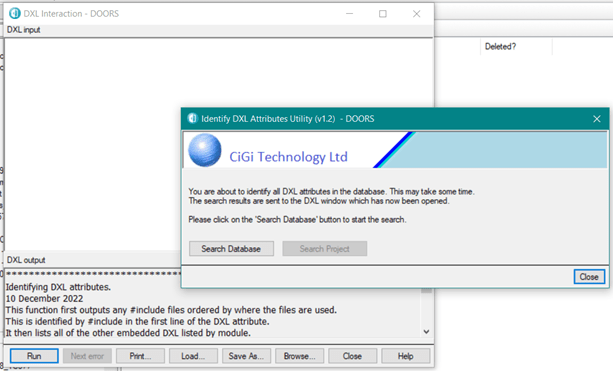
This simple script is used when you get a DXL attribute error but do not know which module is causing the error (which is very common) or when the DOORS administrator wants to identify the DXL attributes in all the modules. Perhaps prior to combining or modifying a specific function.
DXL script to find all DXL attributes in the database
IIf a project is selected before the utility is run, then both buttons are enabled. The user can choose to search the whole database, or limit the search to just the selected project.
DXL Script to find all DXL attributes in a specific project
Depending on the user choice the script then interrogates all modules in the database or the current project, and because this may take some time, then a progress bar is displayed:
Wait progress bar for the DXL Script
When the DXL script completes, it lists the names of the DXL attributes in the DOORS interaction window.
Results page to find all DXL attributes in the database
You can then use the Module Administration utility to confirm and manage the DXL attributes.
All entries are loaded from the modules when the tool starts and compared to the attributes for the current Object. Matched terms and their meanings are displayed. No links are involved.
Display Meaning Tool
The tool can also be used to add, delete or edit existing
entries in any of the common modules and there is also functionality to open
the original source document using its URL.
It is very common practice to introduce a hierarchical breakdown of a project according to the products or systems. This is known either as a Product Breakdown Structure (PBS) or System Breakdown Structure (SBS). There are a number of ways to introduce this into the DOORS database. You could use an attribute in every module with an enumerated list containing all the PBS values. The disadvantage of this approach is that when you have to make a change to the list (and this is more common than people think) then the type has to be changed in every module. Whilst this is easy to achieve using the Module Administration tool (see Module Administration utility), the second disadvantage is that you cannot actually see a hierarchy in a flat list of elements. You also cannot see a combined list for all modules. So, if you wanted to see requirements allocated to System X then you would have to search all modules and somehow collate the results together.
A more effective approach is to build a PBS into a standalone module. This has a number of advantages:
The
hierarchy is immediately obvious;
The
list can be easily changed;
The
item can have additional attributes such as a description;
By
linking requirements to items in the PBS it is possible to display the values
as a DXL attribute; and
Most
importantly, by viewing the requirements from the perspective of the PBS you
can see the impact of making a change to the PBS– before making the change. Impact
analysis is greatly enhanced.
The principle can
be adopted for any hierarchical list. For example, hazards can be broken down
into causes.
The same principle for a PBS can be applied to a
Verification Breakdown Structure (VBS). In fact, using DOORS as a relational
database, it can be applied to any form of enumeration (Organisation Breakdown
Structure (OBS) or Work Breakdown Structure (WBS) although over-use can result
in spaghetti-like links.
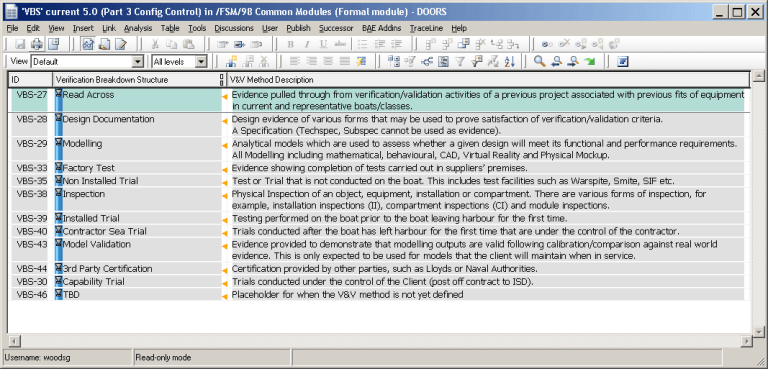
The Verification Methods would be defined in the Verification Breakdown
Structure, or its equivalent, and therefore it is very easy to identify all
requirements that will be affected by a single Verification Method by looking
at all the links from the VBS module. This permits the use of multiple
Verification Goal modules structuring and ordering the Verification activities
according to operational rather than functional needs. This approach makes the
generation of the Test Procedures/Test Schedules very controlled as the modules
provide the framework.
Another point to note is that there should always be a
strict data model enforced within the database with reserved words for the link
relationships. More details on how CiGi Technology can help you produce a data
model can be found in Consultancy
Services.
Example VBS
DXL
Attributes can be used to show the results of the link.
It is commonplace to see in a requirement statement the
phrase “in accordance with xxx” where
xxx is the title of a reference or “ … in accordance with Reference nnn” where
nnn is a unique number assigned to a reference. How is this managed in DOORS so
that the references are controlled and that any change is propagated through
the whole of the project?
In particular, it is very important to know the issue or version referenced from a requirement as any change in content may significantly affect a requirement and initiate an impact analysis (that determines what would be the impact of changing a reference). Unfortunately, there is nothing readily available in DOORS Classic that can help.
However, what we can do is to build a reference or evidence
list.
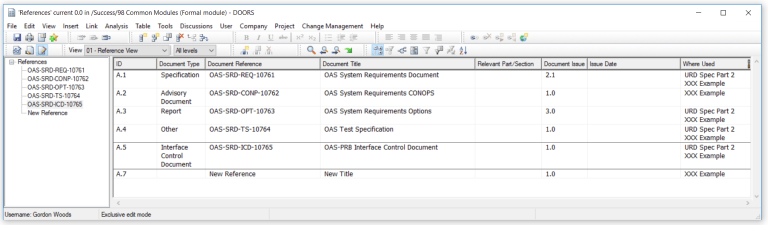
A reference list
would contain all the documents that are referenced by the requirements. As
well as the mandatory attributes such as the document reference number, title
and version/issue we could add additional information such as the document
type, who authored the document and when it was issued.
Example References
The question of what requirements would be affected can be
automated using DXL to provide the identification of where it is used. Thereby
considerably reducing the amount of time that the management of external and internal
referenced documents would take for an organisation.
An evidence list has similar properties but it is used to
identify documents external to DOORS that are used in the evidence trail. For
example, Standard Operating Procedures, Test Cases, Test Reports etc.
Example Evidence List
Additional attributes may include Verification or Validation identification and external hyperlinks to a document repository. The important thing to note is that the traceability from evidence to the requirements is continuous.
In these examples we are using an internal repository module/table. We could have alternatively used direct traceability links such as provided by Open Services for Lifecycle Collaboration (OSLC). Support on OSLC synchronisation to external document repositories such as Aconex, Documentum or TeamBinder is also available.
It is extremely useful if Abbreviations are defined either
at the Company or at the project level. This will prevent misunderstanding if
the same abbreviation has different meanings on different projects.
An example of this
could be ‘PBIT’ which could mean either “Power up BIT” or “Periodic BIT”. A
misunderstanding in the use of this term between teams could lead to totally
different functionality resulting in significant interface issues and rework.
Example Abbreviations
In this type of
implementation then a sophisticated DXL Attribute is used to display the ‘Where
Used’ values – there are no links involved.
It is interesting to note that this functionality is already
available in DOORS Next.
A data repository is always needed because words can have
different meanings in different contexts. They also can be highly specific:
Identification – A user (person or
system) must supply an identifier and/or the system must in turn supply an
identifier to the user so that the user knows that he is accessing the right
system.
Authentication – The identity of the user must be authenticated (i.e.,
verified so that we know that the user is who/what the identifier is associated
with). That is, authentication is the verification of the identity assigned
during Identification.
Authorization – Once a user has been identified and
the user’s identity has been authenticated, the user can use the services and
access the data that the user is authorized to use and
access. This can be done by membership in a group or done on an individual
identifier basis.
Use of italics and/or Capitalisation of a word is
often used as a means of indicating a glossary item, so that it is clear to the
reader that it is not just a word in a sentence, but it has a defined meaning.
A parser can now check the specification for undefined terms.
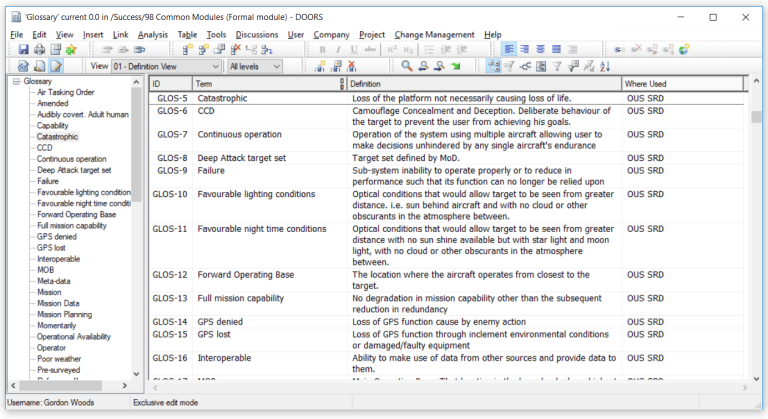
A glossary in a requirements specification, and which is
project wide, is absolutely essential as it provides the precise definition of all
terms.
Example Glossary
In this type of implementation then DXL Attributes are used to display the ‘Where Used’ values – there are no links involved. As with the Abbreviation terms, then this functionality is already available in DOORS Next.
For information on a DXL Script that pulls all these features together then click here.
The uses for DXL attributes are enormous. They range from
showing the specific content from links, or multiple links, or multiple hops
through links, calculated values, filtered values etc.
Layout DXL can be easily generated by a user with the
inbuilt traceability wizards. Primarily
for performance reasons, Layout DXL should always be converted to a DXL
attribute (again using the DOORS inbuilt functionality). But there are other
advantages:
Although the code of a DXL attribute can exist within a
module it is more commonly referenced to an external include file. This has the
significant advantage of reuse. If a script is located in the addins folder
then once that file is modified the changes are instantly propagated to all
modules that use this attribute ensuring consistent use across the project. Of
course, you only have to make a single modification.
You can even have a single include file with all the required
functions embedded within it.
For example:
Example of a DXL script containing multiple DXL functions
This has the advantage that common functions for displaying
text from buffers are all in one place.
The DXL attribute then consists of an include to this file
and then a call to the appropriate function.
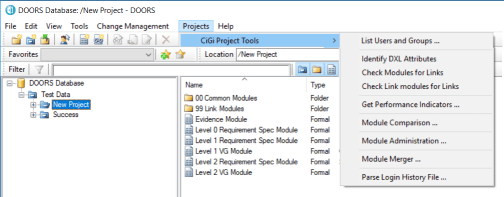
It is very simple to add custom menus for both the top level database menu (for project wide utilities) or for the module level. However, it is very important to ensure that the utility is added to the correct menu so that the two types of functionality are not mixed.
This is an example of a global type menu:
Example of a Project menu dropdown
This menu can be added in two ways. The first is by the use
of .idx files which are simple textual lists of the menu which are interpreted
by DOORS or secondly by DXL scripts which use the DXL functions createMenu (), createItem
() and separator().
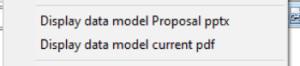
The menus can also be used to directly launch help documents
so that they are readily available to the users. No more searching through the
team SharePoint site hunting for the training manual… It is available at the
click of a menu.
Example Help menu
This is particularly useful for user guides, data models and
training material. Word, PowerPoint and pdf document styles are already
embedded within our generic DXL script – and the list can be readily tailored
for your project. For example, you could add work-flows displayed in Visio.
All of CiGi Technology utilities have additional protection
so that project wide utilities can only be run from the main menu and that only
module level utilities can only be run from within a module. There can also be
protection added so that only authorised groups can use either the complete
utility or specific functions within the utility.